Adding Lights to a HO Scale Union Pacific Water Tender Part 1

My 3D printed tender kits for Union Pacific’s excursion trains are now available in several scales.  The kits come with 3D printed headlights, or more correctly, backup lights.  In this post I will share with you how I finished a set of HO tenders with working backup lights.

Only one headlight will work on each tender.  This will be the one at the rear and will only come on when the locomotive and tender or tenders are backing up.  The headlight on the front of the tenders will be a dummy.  I need the lights to work in both DC and DCC modes.  To do this I am going to use Digitrax single function decoder TL1.  This simple decoder only has four wires, two which go to the track and two which go to the lamp in the headlight.

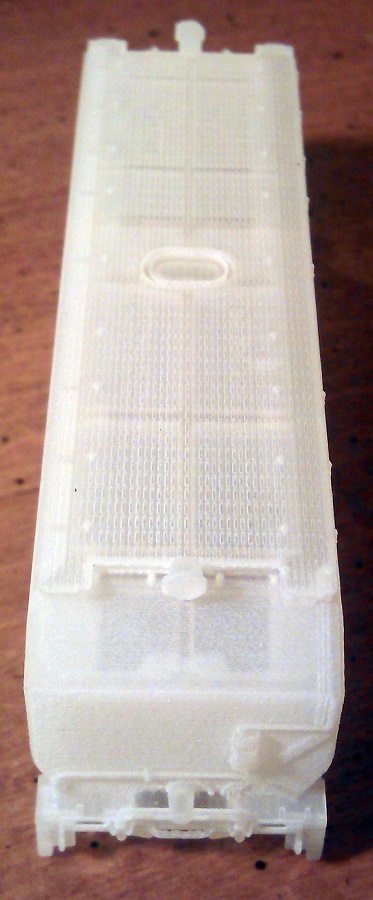
The kit, as shown below, has several parts printed in two different materials.  All the high detail parts can be printed in Shapeways Frosted Detail or Frosted Ultra Detail materials.  The low detail parts such as the chassis are printed in Shapeways White Strong & Flexible material.  When the kit arrives from Shapeways the headlights are attached to the loop that joins the ladders together; in the image below I have cut the loop and removed the ladders.

HO UP Tender Parts

The first thing to do is to work out how to collect power from the rails and get it into the body of the tender.  To do this I am going to use metal wheels with axle wipers.  One truck will collect power from the left rail, the other will collect from the right rail.

The trucks that come with the kit, as pictured below, are designed to take Proto 2000 33″ metal wheels from Walthers.  The trucks are fixed to the chassis with 3D printed bolster pins that simply push in.

HO UP Tender Power Pickup 1

Although the Proto 2000 wheel sets have metal wheels the axle is made from plastic which is no use for picking up power.  A good alternative are Intermountain’s 33″ wheel sets.  These have metal wheels and a metal axle and one of the wheels is electrically isolated from the axle.  However using these does cause a problem.  The point to point dimension of the Intermountain wheel sets is slighty smaller than the Proto 2000 ones.  This means that the wheel sets will fall out when the tender is picked up.  To solve this I have used small off cuts of solid copper wire superglued into the V grove below the axle sockets as pictured below.  When the trucks are the right way up and sat on the track the wheel set axles will be resting against the top of the axle socket; the copper wire simply stops them from falling out.

HO UP Tender Power Pickup 2

The next issue is how to transfer the power from the axle wipers up into the tender.  A flexible wire is the easiest way but the position of the wire can cause complications.  The further away from the bolster pin the wire is the more it will rotate as the tender runs around a bend. A crescent shape will need to be cut into the chassis to receive the wire.  The maximum radius that the tender will be able to negotiate will depend on the size of the crescent.  An alternative to this is to run the flexible wire up through the bolster pin.  Because the HO kit is a scaled up version of the N Scale kit the bolster pins are quite big.

HO UP Tender Power Pickup 3

I used a small drill bit in a pin vice to drill a pilot hole through the bolster pin.  The head of the bolster pin was printed with a hole through the thicker section to reduce material, which helps guide the drill through squarely.

HO UP Tender Power Pickup 4

Then I fitted the bolster pins into the chassis and used the larger drill bit to drill all the way through.  The size of the drill bit depends on the wire and wants to be just a bit bigger to allow the wire to pass through easily.HO UP Tender Power Pickup 5

The bolster pins were then removed and any swarf was removed from the holes.

HO UP Tender Power Pickup 6

Next come the fitting of the wheel sets.  It is very important to note their orientation.  In the image below the wheel set on the left is electrically connected to the wheel at the top.  The wheel set on the right is electrically connected to the wheel at the bottom, you can see the plastic isolator where the top wheel joins the axle.

HO UP Tender Power Pickup 7

It is important to get all the axles in the same truck orientated the same way around. otherwise the truck will cause an electrical short.  Because the trucks are the same, just rotated 180° you can insert the wheel sets the same way round in both, then when they are fitted to the tender one will pick up on one rail and one will pick up in the other.HO UP Tender Power Pickup 8

The trucks can now be fitted to the chassis as shown below.

HO UP Tender Power Pickup 9

Doing a rolling test at this stage is a good idea to ensure the wheels run freely.

HO UP Tender Power Pickup 10

To make the axle wipers I have used 1mm wide phosphor bronze strips about 45mm (1.771″) long.

HO UP Tender Power Pickup 11

The wiper strip is pushed through the axles.  It goes under the two outer axles and on top of the middle one.  That way it will utilize all three axles to collect power.

HO UP Tender Power Pickup 12

Then using my fingers I bent the ends of the wiper strip around the outer axles.  This will stop the strip from rolling out and moving as I work on it..

HO UP Tender Power Pickup 13

Using my soldering iron I tinned up the strip just above the hole in the bolster pin.

HO UP Tender Power Pickup 14

Then one of the wires from the DCC decoder was fed through the chassis and bolster pin.  A small section at the end of the wire was striped back and tinned with solder.  The end was then bent over by 90°.  In the image below this has been done to the black wire.

HO UP Tender Power Pickup 15

This hook can then be positioned over the tinned wiper strip and with a quick touch of the soldering iron they can be joined.

HO UP Tender Power Pickup 16 HO UP Tender Power Pickup 17

There is a risk with this configuration that the axle wiper will rotate and run diagonally across the axles.  If the wiper strip touched a wheel that is isolated from the axle it will cause a short.  There are two things that can be done to prevent this.

The first is to remove one of the end wheel sets, this will cause the wiper strip to fall out.  If you gently roll the ends of the wiper strip around a bit further between your fingers and then refit the wheel set not only will it be a tighter fit almost preventing the wiper strip from going diagonally, it should also improve the contact with the axles thereby improving the power pickup.  This can add drag to the wheel sets and you should check that the tender still rolls well once this has been done.

The second is to add a guide which the wiper strip will run between.  To do this I used some of the same solid copper wire I used in the V slots of the trucks.  I bent the wire into the shape shown below.HO UP Tender Power Pickup 18

This bent wire shape fits down through the second hole in the truck frame as shown below.  Once I was happy with the fit they were superglued in place .

HO UP Tender Power Pickup 19

The forked ends protrude down on either side of the wiper strip giving some room to move but preventing it from going diagonal.  The other end is held in place by the wire coming through the bolster pin.HO UP Tender Power Pickup 20

Below is a close up of a finished truck with a fixed axle wiper collecting power from all three axles.

HO UP Tender Power Pickup 21

This now completes the tender chassis, in next week’s post I will show you how the working tender headlights were fitted and how the tenders were finished.

Cleaning Up 3D Printed Models

This week’s post will be a short one as my wife has got us tickets to see the new Hobbit movie, so I am off to the cinema, but I promise I won’t give any spoilers!  Last week I shared with you my new 3D printed O Scale UP water tenders for the excursion train, you can find the post here.  So this week I will share some of the work I am doing on the tenders, starting with cleaning them up.

The tenders have been printed in Shapeways’ Frosted Detail material. Models printed FD or FUD (Frosted Ultra Detail) have a waxy residue and need to be soaked in Bestine, Goo Gone or somthing similar. This leaves a powder on the surface which is the dried up wax residue.  I have also found that models in FD have more powder than models in FUD.  To remove the powder on my N Scale models I normally use a soft toothbrush and gently scrub the model.  This does not always remove it all, particularly from the difficult-to-reach areas.  To get over this I have a soft brush that fits onto my mini drill, similar to a Dremel tool. Mini Drill - Soft Brush With the large surface area of the O scale tenders this made the job much faster and helped me get into all the tricky areas such as around the grab-rail posts.  These can be delicate and the toothbrush has an increased possibility of knocking them off.

With all the loose powder removed any areas showing evidence of the printing process become clear.  On these particular models it was on the curved ends.  You can see in the picture below that there are ‘veins’ running down the end of the tender.

O Scale Tendre ends (Rough)

These are actually plastic and attached to the model.  To remove these I use my mini drill again with a small sanding stone bit; because it is tapered it allows me to get the flat surface across the face of the model.  The trick here is a little bit at a time, if you go at too hard it is very easy to remove too much.

Mini Drill - Small Sanding Stone

Once the area is ground flat, I use the soft brush bit again to remove any new dust.  In the picture below you can see the finished surface.  It is smooth to the touch.  You can still see the marks where the ‘veins’ were but these will disappear when the model is painted.

O Scale Tender Ends (Smoothed)

Painting the tenders will be the next step and I will share that with you in a later post.

Discovering the Possibilities of Etched Brass Part 4 – With Sound

A few weeks ago I shared with you the etched brass Additions for my EMD DD35 kit, which you can find here.  This week I wanted to share with you some more work-in-progress pictures, this time with the etched brass Additions for my Baldwin DT6-6-2000 kit as shown below.

DT6-6-2000 Additions Set

Below is a photo of a DT6-6-2000 using the stock 3D printed handrails.  An interesting point was raised recently by a fellow modeller who also adds a lot of custom etched brass details to his British OO locomotives and rolling stock.  He said that he has stopped putting the details on all of his stock that he takes to shows because after a few trips the brass details start to get damaged through handling so he is limiting it to just the stock he keeps at home.  Because of points like this the 3D printed hand rails will still be provided with the kits should you wish to use them.   DT6-6-2000 Finished 8 As with the DD35 Additions kit the DT6-6-2000’s handrails can cut out of the brass plate with a sharp craft knife and simply glued into place.  Below are some work-in-progress shots taken by Brian Stewart of one of his DT6-6-2000s, the brass stands out well against his black paint work.

DT6-6-2000 WIP(Brian Stewart) 3 DT6-6-2000 WIP(Brian Stewart) 2 DT6-6-2000 WIP(Brian Stewart) 1

The other DT6-6-2000 shell in the background will be the two tone green Baldwin demonstrator engine.  Brian painted the handrails after he installed them as shown below finishing the locomotive ready for use.

DT6-6-2000 WIP(Brian Stewart) 6 DT6-6-2000 WIP(Brian Stewart) 5

The difference between the 3D printed and etched brass handrails is very noticeable and looks very realistic.

These etched brass Additions are made from 8 thou brass and are very thin, this makes them very flexible and also very easy to bend and misshapen by accident.  Now that I and others have had a good chance to work with them I think that the next sets of brass etched Additions, which will be for the Baldwin RT624, will be made from 10 thou brass and the handrails will be about 0.2mm wider.  This doesn’t sound a lot but it will add more rigidity to the handrails without losing the realistic look they achieve.

When working with very thin etched brass details there are a few things that you can do to bolster them.  A simple method is to add several layers of paint, this will round off the brass giving it a thicker look but will not add any strength, plus it may also cover up small etched details.  Another option is to strengthen the rails by adding solder.  Solder takes very well to brass and is the prefered method of joining brass kits together.  The trick with details like handrails is to coat the rear surface of the handrail with flux.  Then when the hot solder is added to the handrail it will run out over the flux evenly thickening up the brass.  This adds a lot of strength to the handrail but can be tricky to do.  Another option also using solder is to dip the parts in a solder bath, then all the surfaces get an even thin coat of solder which greatly increases the strength.  However by simply making my future etched brass Additions out of thicker brass will solve the issue.

Sometimes having kinks in the handrails can be desirable if you want to make your model look used and tired.  On one of Bob Norris’ DT6-6-2000s he has used a mixture of rust colored paints making the handrails look like they have been soaking up too much of the California sea air.  I particularly like the patterned neckerchief on Burt the driver.

DT6-6-2000 Rusty Rails

DT6-6-2000 Driver

This particular unit also come with sound.  Bob has fitted a Digitrax SDN144A0 DCC sound decoder which is a ‘drop in’ decoder for the donor chassis, an Atlas C-628.  The only changes Bob made was to lengthen the LEDs and change the speaker for a ‘Sugar Cube’ speaker made by Zimo.  This speaker is only 12mm long, 8mm wide and 8mm tall and fits nicely on the chassis where the C-628 cab would have been.  The speaker is much louder than the stock speaker and here is a short video so you can hear it for yourself.

I still have some DT6-6-2000 etched brass Additions left so if you require some for your 3D printed shells please drop me a message using the Contact page.

This coming weekend I will be at the Bearwood Groups running meet with the Poole & District Model Railway Society’s N-trak layout so I will have some photos and videos to share with you from the day and if you are in the area it would be nice to see you.

Finishing Santa Fe No. 2601 – A Baldwin DT6-6-2000

Over the last two weeks I have been working on my latest release, the Baldwin DT6-6-2000, in this post I wanted to share with you the finished model and how we did it.

Following on from my last post about this model in which I showed you the test print, I needed to make some more minor changes to the 3D computer model.  In particular there were a few concerns about the thickness of the window frames in the cab.  Although the test print had printed successfully, these parts where incredibly thin and posed the possibility that they could get damaged in the shipping and handling process. This has now been improved in the 3D model. Also, and I had to laugh when I did this, the engineers cap had the same problem.  He has now been outfitted in much sturdier attire.

With the model successfully printable and available to all it was time to turn my attention to finishing the test print and making it into a proper model.   For this I once again handed the model over to Bob Norris to paint and decal.

As with all my models which are printed in the FUD (Frosted Ultra Detail) material it needed to be cleaned to remove the waxy residue left over from the print process.  You can read more about doing this in my FAQ section.

Once cleaned, as you can see from the photos below, a lot more of the detail becomes visible.  These photos were taken not long after the model was removed from the Goo Gone, it will turn totally white and opaque in about 24 hours.

DT6-6-2000 Cleaned 1 DT6-6-2000 Cleaned 2

The body shell and truck side frames were then sprayed black all over, the intention was to use decals to get the silver tiger stripe look.

DT6-6-2000 in Black

This is where we had a bit of a shock because the decals we had were not silver but black.  This meant that the areas intended to be striped needed to be painted silver.

DT6-6-2000 With Silver

The silver was brush painted and when dry the decals were applied.

DT6-6-2000 Strip Decal 1 DT6-6-2000 Strip Decal 2

Microscale 60-247 is a set of decals which are silver and will work for this model without the need to paint any silver, you can find them here.

The engineer and cab interior was also hand painted and glued inside the shell.  He is very small but he is visible through the window. A lot of the photographs of these engines show the windows open so one of the verticals has been removed to represent this.

DT6-6-2000 Driver

To add glazing to the unopened windows and doors Bob used Micoscale’s Kristal Klear.  This is a great product which quickly allows you to add small window glazing to models.  Another alternative would be to use small rectangles of clear plastic sheet and glue them to the inside of the shell.  The rear of the doors and windows are recessed to help with this.

With all the decals applied and the shell just about finished it was time to look at lighting the engine.  Because the chassis came from an Atlas C-628 the LEDs on the circuit board are shorter than the shell to allow for the cab.  The light is transferred to the headlights via a clear plastic path, similar to a fiber optic cable.  My 3D printed shells don’t have this clear plastic path.  But the inside of the headlights have a pilot hole ready incase you want to add lights.  This can be done very easily using either the original circuit board for DC (Direct Current) or a drop in decoder for DCC (Digital Command Control).

This particular model will be DCC and the original circuit board has been replaced with a Digitrax decoder, model number DN163A0.  Before the decoder was fitted Bob replaced the LEDs with longer ones as pictured below.  Then he drilled through the headlights in the shell, the LEDs on the decoder line up with the headlights in the shell.

DT6-6-2000 LEDs

Another alternative would be to use the Digitrax sound decoder SDN144A0.  Because the chassis is recessed, as shown on the left of the above photo, there is more than enough room for the speaker and capacitor, although you may need to extend the wires to make it all fit.

Once the main body was painted the handrails were added.  I have supplied handrails with all the shells but they are not attached in their final location.  This gives the modeller the choice of using finer brass wire or an equivalent to getter a smaller rail detail and it also makes it easier to paint the shell.  For this model Bob used the supplied printed handrails.  They come inside the shell on a sprue for protection and need to be cut out, this is a delicate process as they are very fragile and brittle. The sprue also braces the shell throughout the print and cleaning process at the Shapeways factory.   Once the sprue has been removed all 6 handrail sections can be removed and painted.  I have supplied very small dimples or holes in the shell to act as locators for the handrails.  These also act as guides to help if you are adding your own wire handrails.  Bob glued the painted handrails onto the shell, here is what they look like.

DT6-6-2000 WIP 1 DT6-6-2000 WIP 3 DT6-6-2000 WIP 5

To complete the model bob used decals from the Microscale sheet 60-247 to add the numbers and AT&SF road markings, he then sealed the paint and decals with a coat of Testers Dulcote.  The shell was fitted back onto the chassis and here are the results.

DT6-6-2000 Finished 1 DT6-6-2000 Finished 2 DT6-6-2000 Finished 3 DT6-6-2000 Finished 5 DT6-6-2000 Finished 6 DT6-6-2000 Finished 7 DT6-6-2000 Finished 9

These shots were taken on Bob’s DC layout so capturing it with the lights on is not so easy but as you can see from he action shot below, they do work

DT6-6-2000 Finished 4

So there we have AT&SF No. 2601, a Baldwin DT6-6-2000 in N Scale.  You can get your own here or we can provide ‘Ready to Run’ models upon request.  In a later post I will share some videos of this locomotive running, maybe teamed up with AT&SF No. 2602.

Completing the Dummy Chassis for a Bachmann EMD DDA40X

The test print for the Bachmann EMD DDA40X has arrived so in this post I will show you how it worked out and what we did with it.

This print was made from Shapeways’ White Strong & Flexible material (WS&F) and this was the first time I’d used it.  The finish was a little rough out of the box but the overall definition was good, as shown below.

DDA40X Dummy Chassis 1

It is, as the name suggests, strong and it holds its shape perfectly.  Given that the chassis  will be mostly covered up the roughness is not a concern, although it could easily be smoothed with a quick wipe with sand paper.

The chassis has been designed to work with the fuel tank which comes with the DDA40X. The fuel tank clips onto the chassis using the same fixing lugs that are on Bachmann’s power chassis.  Below is an image of the tank clipped onto the chassis; what it doesn’t show is that the lip on the chassis that fits inside the tank is little bit too big and needed to be filed down.  This has been fixed in the 3D model.

DDA40X Dummy Chassis 2

Bob, who does the painting and assembling, wanted to add power to the model as the DCC circuit board was still in the shell which also controls the top and tail lights and the flashing light on top.  Because this is a test print, and because I haven’t drawn the correct ones yet, we are using dummy trucks designed for an EMD DD35 model.  These work with 4 Fox Vally 36″ metal wheel sets (FVM3611) each.

The trucks are printed in the Shapeways FUD material as they are highly detailed.  Bob sprayed them with a base gray and then added power pickups using thin copper strip.  The strips where soldered to the ends of bolts to be used instead of the bolster pins as pictured below.

DDA40X Dummy Trucks 2

DDA40X Dummy Trucks 1

The strips pick up power from all axles on each truck.  The washer was added to the first photo above because the chassis sat a little too low and rubbed on the side of the trucks.  An extra down stand has now been added to the chassis 3D model to accommodate this.

The shell needed a little modification as well.  Power wires have been added to the circuit board with washers so they can be connected to the bolts which attach the trucks.

DD40AX Shell 2

The central corridor has also been completed.  Because the Bachmann chassis fills the whole shell, Bachmann did not add the side walls to the corridor, but when the shell is fitted to my dummy chassis there would be a big void viewable through the doorway.  Bob used plastic strips to complete the corridor.  He painted the inside of the walls black and the corridor Armor yellow to match the shell.

DD40AX Shell 3

With all the parts assembled it became apparent that the overall model was too light so Bob added some extra weight inside the fuel tank as pictured below.

DD40AX Shell 4

Here is the model on the track powered up. It runs freely and is perfect for a second unit or mid train helper.

DD40AX Dummy 2

As this was the first time using the WS&F material I’m keen to try it on another project. It is rougher than the FUD and has a little less definition, but its strength and cost effectiveness will lend itself to projects which, if made using the FUD, would be unrealistically overpriced. Obviously body shells etc that require the detail will have to be done in FUD but with 3D printing any range of parts for the layout can be produced, and new materials are always being made available so watch this space!

Once I have drawn up the DDA40X dummy trucks I will make the kit available through my Shapeways site.


Painting the Pre-Rebuilt/Ex Gas Turbine UP Water Tenders

The test print of the Pre-Rebuilt/Ex Gas Turbine UP Water Tender has arrived from Shapeways and in this post I will show you what it looks like and what happens next.  This usually follows the pattern of an inspection, a clean and a touch of color.

Here is how it looks when it arrived, all I have done is taken the parts out of the bags Shapeways ship them in and washed them in a warm soapy water.

UP Ex Turbine Tender 1

As you can see the parts are almost transparent and very glossy because there is still a lot of waxy residue left on them.  The part at the bottom tight of the photo is a not actually from this kit, it’s a replacement pilot for and N scale Atlas 2-8-2 that I am working on, this I will tell you about in another post.

Overall the details appear to have come out very well as yo can see from the photo below showing pipe work on the end beam.

UP Ex Turbine Tender 4

The small loose small parts also printed well, the trucks and bolster pins are from my other UP Water Tender so I knew they would. The ladders are different in this kit and again I tried too make them as small as I could, the ring is to keep them together until you are ready to start modeling.  They are still over sized but as we are working at 1:160 scale sometimes sacrifices have to be made.

UP Ex Turbine Tender 3

The next step is to put the parts into Goo Gone and leave them for 24 hours.  I use and old pasta sauce screw top jar, this is ideal as I don’t have to completely fill it with Goo Gone and it stays sealed, the Goo Gone evaporators quickly.  I use just enough so that once the parts are in and the jar is laid on it side they are completely covered.

After the 24 hour soak the parts are removed and again washed in warm soapy water.  They are then left to dry for a further 24 hours.  In this time the remaining waxy residue ‘fuzzes up’ and becomes powdery on the surface of the model.  This I remove with an old tooth brush.

Once that is done the model looks like the photos below.

UP Ex Turbine Tender 5

UP Ex Turbine Tender 6UP Ex Turbine Tender 7UP Ex Turbine Tender 8

I am now able to see all the detail and it has all printed well.  These shots still show fuzzy build up on the ends that needs to be brushed off.

As it turns out I think I didn’t leave this particular model in the Goo Gone for long enough.  My current jar of Goo Gone has now been used for a lot of models and I think its potency is waning.  Please note, leaving FUD models in Goo Gone, or any other rubber solvent, for too long will make the materiel go soft and start to bend, eventually it will do unrepairable damage.  It is best to stick with the 24 Hour rule, and if that is not enough re-soak for only a few hours at a time until you are happy with the result.

Again for painting I handed the model over to Bob Norris and he went to work.  He started by spraying the whole body with Sea Grey acrylic by Hombrol which also acted as a primer for the yellow as shown below.

UP Ex Turbine Tender 9 UP Ex Turbine Tender 11 UP Ex Turbine Tender 10

Again, I think the excess fuzziness on the ends is due to me not soaking the model for long enough in the Goo Gone.  However not to be beaten Bob used a pencil eraser on the ends which greatly reduce the fuzzy effect and smoothed out the flat areas. The sides of the body were already smooth right from the print stage.

The part of the print that I was most interested to see was the grill mesh on the top.  You may recall from my last post that this had been modeled in as a recessed detail rather than an actual grill. However with the first coat of paint the grill patten relay shows up well and I am very happy with the result as shown below.

UP Ex Turbine Tender 12

With the gray paint dry Bob added the yellow.  He used Armour Yellow from Badger and brush painted 4 coats as shown below.  The red strips are decals.

UP Gas Turbine Tender 3

For this model Bob used railings from a spare Atlas body shell for the grab rails.

UP Gas Turbine Tender 2

UP Gas Turbine Tender 1

The model still needs a few finishing touches such as a splash of silver in the head light lenses, a coat of matt dulcoat to seal everything in, couplings and weathering but we wanted to show you how we where progressing.

The idea for modeling this tender was for the excursion train but originally it would have been a tender for a UP 8500 Class Gas Turbine.  So rather than show it with a steam locomotive here we have the tender in it’s original job.

UP Gas Turbine Tender 4

UP Gas Turbine Tender 5

The paint color doesn’t match the Gas Turbine, this is because it was painted to match the Kato COLA passenger cars which have a deeper yellow.  When the car is totally finished we will get some more photos and possibly a video of it running with the Kato excursion train, but that will be for another post.