A List of How Tos

This week’s post will be nice and short as I have just returned from the wonderful Brighton Modelworld show. We took our whole modular layout ‘Solent Summit’ and after three days of manning our exhibit I must say I’m a bit worn out.

One thing I did bring back from the show was the need to add another page to my website.  A lot of people wanted to know how we created our rock faces, or how we got locomotives to work in certain ways.  As I have already written about some of these topics I have decided to add a ‘How Tos’ page to the gallery which will list all the topics I have covered so far.  The posts under this heading will only be the ones where the focus of the post is how to do something, so any posts where I am simply sharing with you the results will not be included.  As I write more ‘How Tos’ they will be added to this page.

You can find the page here or by selecting the gallery page in the drop down menu above.

The Brighton Modelworld event was a fantastic show but as I was so busy running the layout for three days I didn’t get any pictures of it.  However I did manage to capture three videos of my trains running on the layout.

First we have the Southern Pacific Overnight express powered by four black widow F7s.  These are the ones I wrote about in my ‘How Tos’ post ‘Converting An N Scale Bachmann F7 to DCC’.  The train is crossing the river Warsash on the Warsah Wye trestle.

Secondly we have the Southern Pacific Sunset Limited also crossing the Warshah Wye trestle.  The three Alco PA’s have the assistance of a 4-6-4 steamer as the train battles the grade.

And thirdly we have a pair of Santa Fe DT6-6-2000 transfer locomotives working a train of perishable box cars through New Mills on their way to the SF East End yard.

In next week’s post I will be getting back to 3D printed products and sharing with you the first 3D printed N Scale Alco C-855.

Replacing Con-Cor U50, Turbine & JTP C-855 Wheelsets

This week’s post is a little bit different in that it’s a guest post.  Fellow N Scale modeller Mike Musick has written an article about improving Con-Cors N Scale U50s, Turbines, and my imminent C-855 by replacing the wheel sets.

So without further ado, I hand you over to Mike.

BETTER WHEEL APPEARANCE FOR CON-COR U50 MODELS
(Also applies to Con-Cor Veranda Turbines)
———————————————-

The Con-Cor U50’s ungainly aesthetics are not helped by its oversize wheels. In all production runs the wheels measure to a scale 48″, versus the prototype’s 40″. While the 0.025″ increase in model height alone doesn’t alter the proportions perceptibly, the too-large diameter plus the oversized flanges of the 1970s design result in the wheels being visible above the truck frame, giving the model a toy-like appearance.

Oddly, the Con-Cor/Kato model of the PA produced prior to the U50 had nearly-correct wheel diameters. Replacing the U50 driven wheels (eight of the sixteen) with PA wheelsets is a straight-across swap since the gear and axle sizes are the same. However, it does require the sacrifice of an out-of-production PA model, and carries forward the large flanges of the era. It also doesn’t solve the issue of the undriven idler axles on the inner U50 trucks, which have cone-point bearings.

Fortunately, there are wheels and point-axle wheelsets available from Northwest Short Line (nwsl.com) for retrofit. The separate wheels work well and look good, but will require fabrication of half-axles to work with the Con-Cor gearing. We are specifying 42″ wheels as opposed to 40″ to stay out of trouble with truck frame clearance issues on less-than-perfect track.

NWSL Wheels
———–

Powered axles use NWSL #96000110, “N scale WHEEL ONLY, 42″/64 NS, 3/32″ bore”. You will need eight (8) wheels per locomotive.

Unpowered axles use a custom wheelset, specified as “N 42″/64 wheels on Pointed 1.5mm x .560″ axle (4/pkg)”. A single package of four (4) wheels covers each locomotive. Specify bright NS finish to match the powered wheels.

Installation
————

Removing wheelsets is a simple operation. Remove the two screws in the driven trucks, and the outer frame will lift off, with the idler truck probably lifting off at the same time. The driven wheelsets will be easy to remove. On some production runs there is a brass shim on one side of the center frame, be sure to note the orientation before removing the second axle.

With each idler truck separated from the driven truck, unscrew the single frame screw from the weight to access the wheelsets. Snap out the wheelsets and replace with the NWSL point-axle versions. Reassemble frame and set aside for later assembly with the driven trucks.

Carefully remove the half-axles from the gears by firmly pulling. Be careful to not use any bending forces against the plastic gear shaft since it is easily bent, resulting in a wobbly finished axle.

For the new half-axles, use 3/32″ K&S brass tubing in the standard hobby-store wall thickness. Cut eight pieces of this tubing to a moderately precise 0.193″, as this determines wheel gauge. Dress each cut end with a needle file, then insert each piece of tubing into a wheel so the end of the tubing is flush with the outer hub. Don’t rely on measuring the old half-axles to determine axle length. They are 0.200″. The 0.007″ difference corresponds to the narrower tread of the NWSL “/64″ wheel size.

DO NOT try to press the new half-axles onto a gear shaft! At least not yet. The tubing must first be reamed to fit the gear shaft; attempts to press-fit without reaming will likely result in a broken gear shaft. First dress the inner edge of the tubing with a micro needle file or jeweler’s cone reamer, then follow with a #52 (0.0635”) drill bit (Be advised that a 1.65mm bit might be too large and 1.6mm too small. Try the larger bit first with a scrap of tubing for snug fit. Forcing a too-tight, smaller reaming size risks breaking the axle), reaming the entire length of tubing. This will make for a firm but not-too-firm press fit on the Con-Cor gear shaft. With both half-axles on the gear shaft, check gauge and adjust if necessary.

Repeat the process for the other three driven axles, then reassemble. Don’t forget the brass shims in the proper locations if your model had them. Be sure to observe the orientation of the idler truck since it is very easy to install upside down. Check run the loco and you are all done.

Mike also provided a few photos to show the difference in an original and converted U50 model; the original wheelsets are in the loco on the left.

Con -Cor U50-Turbine Wheelsets 4 (Mike Musick)

Close up the gap between the truck and rail head is notably different as well as the lack of flange protruding above the truck.

Con -Cor U50-Turbine Wheelsets 6 (Mike Musick)

In this shot you can clearly see the difference in flange width.

Con -Cor U50-Turbine Wheelsets 7 (Mike Musick)

Below is a close up of the NWSL wheels in place.

Con -Cor U50-Turbine Wheelsets 3 (Mike Musick)

And a shot of them before they were attached to the drive axle.

Con -Cor U50-Turbine Wheelsets 2 (Mike Musick)

I leave you this week by saying thanks to Mike for his post and to let you know that I will be at Brighton Model World this weekend with all of our N Scale module layout, ‘Solent Summit’.  So if you are in the area and are coming to the show please come and say hello.

Drawing an Alco C-855 for N Scale Part 5

If you have been following my blog for a while you will know that I have been working on an N Scale Alco C-855.  You can read the first part here.  In this week”s post I will share with you what I have done to finish the A unit and get it ready to order a test print.

In my last post about the C-855 I showed you the first print of the metal chassis extenders and how I fitted them into the Con-Cor Turbine/U50 chassis.

C-855 Chassis Build 15

This chassis runs well, and pulls even more than in its original counterpart; probably due to the increased weight.  However there were a few issues with the print so I have improved the 3D model to rectify them.  In the image below you can see both parts from the top and bottom.

Alco C-855 Chassis Extenders mk2 (render)

The space for the motor has been widened by a fraction as the motor was a tight fit in the first print.  The wire channel has also been increased in size so the motor wire is a better fit.  I have also made some changes to the bottom of the lower section.  The arrows point forward on both parts to help with orientation when assembling the chassis.  There is now a rectangular nub that sticks out to locate the fuel tank on the bottom of the locomotive.  Also a square hole has been added which has been designed to take a 3D printed screw fixing which is used to hold on the fuel tank.  The exploded view below shows how these fit together.

Alco C-855 Fuel Tank Fitting 1 (render)

I have designed this assembly so the original Con-Cor turbine/U50 screw can be used athough any similar size screw will work.

Alco C-855 Fuel Tank Fitting 2 (render)

This section of the fuel tank is only the bottom as the sides are part of the main body.  Looking at the image above you can see a square hole in the side of the fuel tank, this is designed to receive a nub sticking out from the shell. You can see the nub in the image below which shows half of the shell.  As the bottom of the fuel tank is fixed with the screw it becomes a solid fixing for the shell.

Alco C-855 In Side Shell (Render)

As with a lot of ready-to-run locomotives, to remove the shell it can simply be spread in the middle and lifted off.

To make painting and adding decals to this model easier the four large sand boxes on the sides have been made as separate parts.  The rear six are the same but the front pair are longer as they have to step over parts of the chassis.  The shell has slotted fixings in the side of the running board to receive the sand boxes so they can be securely fitted.  The holes on the tops are handrail fixings.

Alco C-855 Sandboxes (render)

As with my DT6-6-2000 and RT-624 locomotives my C-855 will come with crew for the cab, Bert and Ernie.  The controls on the console are very basic but this is N scale so once they are inside the cab it will be hard to see anyway.

Alco C-855 Crew (Render)

Because of the shape of the chassis, there is a large chunk of metal sticking up into the cab, the crew had to be pushed to the sides.  There are locator pockets in the shell walls to receive the crew once they have been painted.  As the C-855s ran in an A-B-A configuration you may not want crew in the rear A unit so they can simply be left out.

Below you can see the crew in their place with half the shell removed.

Alco C-855 Inside cab (Render)

This view also shows you the headlight fitting in the roof of the cab.  The shell has been shaped to receive a standard 3v 2mm LED.  A nice warm white LED can be fitted directly into the roof of the cab and a pair of headlights will shine from the front.  This area will need to be painted black on the inside to prevent the light from shining through the shell.

Even the horn is a separate 3D printed part; this is both to make it easer to paint and to protect it from being knocked off in shipping.  Below you can see all the 3D printed plastic parts for one C-855.  The large gears are the drive shaft extenders which are needed when the chassis is extended.

Alco C-855 3D printed parts (render)

In the cab you can see lots of holes; this is because all the grab irons and handrails plus many other details are brass parts that will be supplied in a brass Additions set. The set will also include some of the metal walkways, windscreen wipers, side ladders, MU hoses and sun visors for the cab.

So putting this all together, this is how the N Scale C-855 will look.  Please note the trucks under the 3D model are not yet correct.

The end will have brass grab irons up the center and walkways over the air intakes.

Alco C-855 end (render)

The cab with all of its brass parts will be well detailed

Alco C-855 666.Front (render)

Overall this monster of a locomotive has an imposing presence.

Alco C-855 (Render)

The next step is to finish the drawings for the B unit and design a dummy chassis so an A-B-A set can be made without powering all the units, if required.

The new 3D printed metal parts as well as the 3D printed plastic parts for the C-855 have new been sent for test printing so I should have the first N Scale C-855 within the next few weeks.  Once it arrives and I have cleaned up all the parts I will share some images with you.

Improving Peco Points for DCC Operation

In this week’s post I will show you how I modify Peco points or turnouts to use with DCC, and explain why I make the changes.

Peco make a variety of points in all the common scales and I have used them for many years.  Personally, having used them for American and British trains in both N and OO scales, I think they are the best ready-to-run points available.  However I always make modifications to them rather than use them directly out of the packet.  You can use them directly from the packet and they will work just fine, but I find for lasting reliability a few improvements are needed.  For my example I am using some brand new OO/HO large radius points as shown bellow.

Peco Points DCC Conversion 1

This point, as it states on the packet, is an Electrofrog.  This means that the area where the rails cross, commonly called the frog, is metal, allowing the maximum amount of electrical connection with the pickup wheels of your trains.  Peco’s other points are called Insulfrog and these have a plastic frog. Insulfrogs are the easiest to install because the plastic frog isolates all the rails so you don’t have to make any electrical brakes in the track or do any special electrics. But the downside is the large electrically ‘dead’ section over the plastic frog which can cause stalls with slow-moving or small trains.  So I always use Electrofrog points.

To use the point shown below all you need to do is connect the two inner rails using a plastic rail joiner.

Peco Points DCC Conversion 2

Below is an extract from the back of the Peco packet showing how to wire this up for DC or DCC power.  With DC power if you don’t include the isolating rail joiner the point will also switch the power on and off in the two sidings.  It does this by making the polarity of the rail connected to the frog the same as the stock rail (outside rail) for the route that is not selected.

Peco Points DCC Conversion 2-1

As I said before, using this point directly out of the packet and connecting it as shown above should work just fine but the drawback is how the power is delivered to the frog.

As supplied, the frog relies on electricity travelling from the stock rail into the point blade via the contact of the two surfaces.  Then it travels up the blade rail to the frog.  When the point is changed the other point blade makes contact with the other stock rail and the power is fed from that side, also reversing the polarity of the frog.  The point throw bar has a built-in spring which keeps pressure on the point blade, holding it against the stock rail.  When the track is new and shiny this is fine, but over time dust and grime will get inbetween the two and the electrical connection will become weaker.  And if you weather and ballast your track this connection will probably stop working altogether.  It can be cleaned by using a piece of fine sand paper or a file but this is not an ideal solution or a permanent fix.  Plus the point blade can easily be bent and it’s next to impossible to get it back to straight again.

There is also another problem that can occur.  Electricity will always follow the path of least resistance.  For example if you had a bit of track with two power connections and one was badly soldered, although you can’t tell, the electricity would flow through the good connection.

So imagine you had a point connected as described above with dirt or dust inbetween the point blade and the stock rail; it’s just about working and the locos will travel over it.  But the train you are pulling has a coach with a light in it powered from the track and there are pick-ups on all wheels of the coach.  As the coach spans the point blade, i.e with one truck or bogie on the stock rails and one on the frog the electricity will elect to travel through the coach and not through the points.  If the lighting circuit in the coach is only a 1.3v LED with a tiny current draw it will not be designed for a lot of power and there is a chance that it will blow.  This could happen as the full voltage being pulled by the loco is now passing thought the coach circuit.  With a DCC powered layout it may also have the current from several locos running through the coach and I have seen a coach that was parked across such a point that got so hot that the truck actually melted.

So now you know why I modify the points, but what do I actually do?

The first step is to decide how else you can power the frog because it needs to be fed from one stock rail or the other, depending on the direction it’s set in.  This can be done in a variety of ways.  Peco make an accessory switch that can be fitted to their point motors to power the frog.  Seep point motors and Tortoise slow motion point motors both have a built-in switche that can be connect directly to the frog.  Peco also make an electronic switch called a smart frog, this will only work with DCC.  The smart frog is connected to the power bus and the frog. As a train wheel makes contact with the frog, if the polarity is wrong, it will detect a short faster than the DCC control system and reverse the polarity, allowing the train to continue as if nothing was wrong. Other companies like Tam Valley make the Frog Juicer which works in a similar way to the Peco smart frog.

Simply feeding the frog will greatly improve the performance of the point because the power will run up into the frog and back down the point blades but there’s still an issue.  The point blade that’s not touching a stock rail will be a different polarity, as both point blades and the frog are all the same, and there’s the possibility with wide flanged rolling stock that a short could happen as a train passes by.  To overcome this Peco have given access to the connecting wires on the underside of the point.  In the picture below you can see two small slots in the plastic, each with a connecting wire in.  These wires join the frog to the point blades. I remove these wires; as they have been spot welded in the factory you can simply put a small flat ended screwdriver into the slot next to the wire joint and twist.  The spot weld will break, repeat for the other end and the wire will fall out.

Peco Points DCC Conversion 3 The problem now is the point blades are again reliant on the contact with the stock rail, however Peco have made this easy to fix.  As you can see in the image below, next to the slots where we removed the connecting wire, they have omitted some of the plastic allowing access to the underside of the stock rails and the top of the point blades.  On older points this access is not there but can easily be made with a sharp knife.

Peco Points DCC Conversion 5

Using a soldering iron I tinned the underside of the rails with solder.

Peco Points DCC Conversion 6

I then stripped the insulation off some solid core wire and cut it into strips, the same length as the distance between the stock rail and nearest point blade.

Peco Points DCC Conversion 7

Then I placed the wire over the gaps and used the soldering iron to attach each end to the tinned area.

Peco Points DCC Conversion 8

Repeating this on both sides means that the point blades are permanently connected to the stock rails.

Peco Points DCC Conversion 9

And there you go; the point is ready to be installed on the layout.  There’s no danger of a bad connection to the point blades, or a short between the free point blade and the stock rail and the frog is powered via a switch.  This point will be electrically reliable even when weathered and ballasted .

Peco Points DCC Conversion 10

So although Peco points work straight from the packet, in my experience making these improvements up front will make your layout more reliable and keep your trains running well for years.

Converting An N Scale Bachmann F7 to DCC

The N Scale Bachmann F7 has had three revisions to date and the most recent one, made available in 2013, is supplied with DCC.  But what about the first two?  In this post I will show you how I add DCC to the locomotives in a cost-effective way.

The Bachamm F7 over all is not a bad locomotive; it has great polling power and the body work, although not as good as the Intermountain model, is nice.  They do tend to run a bit noisily so installing a sound decoder for me was not an option. As I have several of these, installing a basic decoder in each starts to add up, so again I am going to use one decoder to power two locomotives.  When doing this it is important that the locomotives run at similar speeds when used together on DC power.  Luckily these do, but if yours don’t I have already covered a topic like this and you can read about it here.

Bacmann F7 DCC Install 34

The F7 A & B set I am converting to DCC, as shown above, is the second version but both first ‘Plus’ version and the second ‘Spectrum’ version are very similar in chassis shape and design so this method will work for both.  You can read about the difference in Spookshows N Scale encyclopedia here.

With the shells removed, as you can see below, both the A and B units are exactly the same with the exception of the A unit having a light bulb pushed into the hole at the front.  To remove the shells simply spread them at the fuel tank and they will un clip then lift off.  You will also see that the chassis totally fills the A unit shell leaving no room for a DCC decoder to be installed.  But because the B unit has the same chassis there is space in the B unit where the cab would have been so I will be putting my decoder there.

Bacmann F7 DCC Install 1

There are no wires inside the chassis, which is split into two, and the light bulb simply picks up power by touching the chassis halves.  A down side to this when running on DC is the light comes on in reverse as well.  And for DCC,  the motor picks up its power in the same way so we will need to isolate it.

To take the chassis apart is fairly simple.  First remove the fuel tank by undoing the screw in the middle.

Bacmann F7 DCC Install 2

Then undo the two chassis screws in the left half and it will lift off.

Bacmann F7 DCC Install 3

Turning the left half over you will see a spring projecting out of the chassis.  This is the bottom motor contact that connects the left half to the motor.  This spring needs to be removed simply by pulling it out.

Bacmann F7 DCC Install 4

With the two halves separated the whole assembly will come apart.  The motor simply lifts out and the truck assemblies will already be free.

Bacmann F7 DCC Install 5

The right half of the chassis has a stub that sticks out and connects to the top motor contact.

Bacmann F7 DCC Install 37

This stub needs to be removed.  This can done with a good pair of large side snips and a file.  The chassis is made from a fairly soft metal so it files down quickly.  In the photo above you will also see the inside of the black tape that has been put across the holes in the chassis. I believe Bachamnn added this to the second version to prevent particles getting into the motor winding.  Also as it is sticky on the inside it will catch any particles thrown off the motor brushes.  You can see some of those just below the stub. Filling the stub will create metal fillings which you also don’t want to get in your motor so once the stub has gone remove the black tape and clean the chassis half to remove all the filings.  A stiff brush will normaly do this.

With the chassis half clean, you can do a test fit with the motor to make sure the motor contacts to not touch the chassis.

Bacmann F7 DCC Install 6

To do a proper test the chassis can be resembled with just the motor in it and you can do a continuity test with a volt meter.  Dont forget to put the little plastic spacers back in, there is one for each screw and one in the fuel tank.

Bacmann F7 DCC Install 7

Next we need to create a path for the bottom motor wire.  As there is no room inside, the wire will have to come up the outside of the chassis but as the shell is a snug fit around the motor, there is still no room.

Bacmann F7 DCC Install 8

So in order to make room I have filled a V grove up the side of the right chassis half.

Bacmann F7 DCC Install 9

The grove also continues round under the fuel tank.  The grove needs to be just big enough to take the wire you are using so the face of the chassis and wire will be flush.

Bacmann F7 DCC Install 10

Once any metal fillings have been removed the chassis is now ready and we can turn our attention to the motor.  The motor body is already isolated from the contacts so all we need to do is add our wires to the contacts.  Although we can change this later it is useful to add the right wires onto the motor now so we know which is the positive side.  Normally orange is the positive motor wire and gray is the negative.  But there is no indication on the motor as to which is which.  On my work bench I have a DC controller with a test track and a pair of wires.  When a train is running forwards and to the left the right rail is my positive, colored red, and the left is my negative, colored back.  Touching the red and black wires onto the contacts will make the motor spin and in the configuration shown below you want the motor to spin anticlockwise.  That would be the same as forwards to the left.

Bacmann F7 DCC Install 11

To add the wires I quickly heat the contacts with the soldering iron, for one to two seconds, then add a little bit of solder just to tin the contact. You don’t want to over heat the contact is it is a perfect conductor of heat and there are plastic parts inside. Next I tin the end of my wire, hold it to the contact and quickly touch it with the iron.  The two tinned areas fuse and you have a good connection.  Note the wires need to be long enough to run up inside the locomotive and across to the B unit.

Bacmann F7 DCC Install 12

Before re-assembling the chassis I also change the couplings on the loco.   When these where being run under DC I used Unimate couplings from Red Caboose.  These provide a nice close couple that will not come undone on the track however as I will now have wires running between my locos I don’t want them to come uncoupled at all.  To do this I will replace the Unimates between the A and B unit with one of my fixed link couplings.

In the image below you can see the underside of the Bachamnn power truck.  Just to the right of the tuck and before the coupling box are a pair of pins that can be squeezed together with a pair of needle nose tweezers.  This will cause the coupler box to pop off.

Bacmann F7 DCC Install 13

Inside the coupler box is a spring that fixes over the peg on the back of the coupler.

Bacmann F7 DCC Install 14

My 3D printed fixed coupler is a direct replacement for the old Rapido style couplers so drops right into the Bachmann coupler box.

Bacmann F7 DCC Install 15

For now I only fixed one truck to the fixed link but you could do two, one from the A unit and one from the B unit, at this point.

Bacmann F7 DCC Install 16

Now the chassis can be reassembled.  Note the wire form the bottom motor contact is coming out the bottom of the chassis in front of the plastic spacer. (I know the wire is brown and not gray but I have run out of gray!).  Also when you refit the tracks make sure the metal contact for power pickup is rubbing against the underside of the chassis not the inside as this will prevent the trucks from rotating.

Bacmann F7 DCC Install 17

The brown wire (bottom motor connection) can now be placed in V grove that was filed earlier and the fuel tank can be replaced.  Also I have put some Kapton Tape over the holes in the chassis to replace the black tape I removed, this also holds the wire in place.

Bacmann F7 DCC Install 18

Now the motor is isolated and wired up the next two wires are the power supply.  On top of the chassis are four nubs that the shell sits onto.  Interstingly these are slightly narrower on the bottom than they are on the top so all I do is wrap the end if my wire around the base of the nub a full 180° and solder it in place.  I have yet to have one of these fail.  And as long as there is nothing sticking up above the top of the nub the shell will still fit.  The red wire goes to the right side and the black, or purple in my case, goes to the left.  I must order some more different colored wire!

Bacmann F7 DCC Install 23

The last wires, for the A unit, are for the light.  The standard light is a light bulb and these can be power-hungry and get hot.  So I replace mine with warm white LEDs. Below is a comparison with standard 3mm LED on the right and a 1.8mm LED on the left which I will be using.

Bacmann F7 DCC Install 19

As all LEDs need a resistor in line I make the resistor a part of the headlight by folding one of the resistor legs back onto its self and soldering it to the LED.

Bacmann F7 DCC Install 20

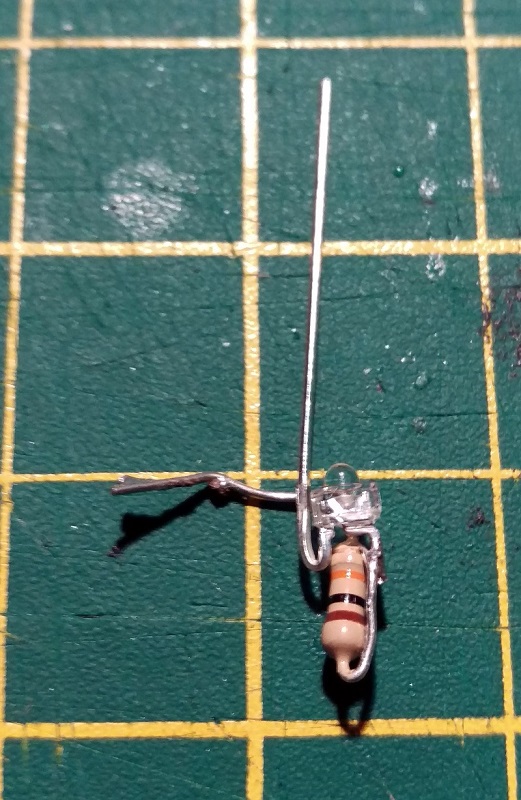
Then I wrap it all in Kapton Tape to prevent it shorting.

Bacmann F7 DCC Install 21

Finally I trim back the legs ready to solder on the wires.

Bacmann F7 DCC Install 22

The LED will sit in the same place as the light bulb.  To protect against shorts I put a strip of Kapton Tape over the nose then cut out the hole with a sharp knife.

Bacmann F7 DCC Install 24

The LED light assembly then pushes into the hole and the legs, sitting on top of the Kapton Tape, can be soldered too.  As LEDs only work in one direction it is important to know which is the positive and negative.  The blue wire, matching the decoder, is the positive.

Bacmann F7 DCC Install 25

With all the wires in place they can now be taped down with Kapton Tape so they are tidy and clear of the shell.  Check to make sure the trucks rotate freely.

Bacmann F7 DCC Install 26

To fit the shell I you could simply run the wires through the window in the connecting door at the back but this can be really tricky so using a sharp knife I simply remove the plastic under the window.

Bacmann F7 DCC Install 27

This allows the shell to be lowered onto the chassis without pulling or pushing on the wires.

Bacmann F7 DCC Install 28

When it comes to the B unit I do exactly the same, except the wires run to the front and there is no light.

Bacmann F7 DCC Install 29

To join all the wires up I like to uses little bits of cooper strip board.

Bacmann F7 DCC Install 30

These are then superglued to the nose of the B unit.  You could use one piece and glue it to both sides of the chassis but this would mean the unit could not be taken apart for repair if needed.  You also need to make sure the DCC decoder will fit behind the cooper strip boards and they do not protrude out side of the chassis so the shell will still fit.

Bacmann F7 DCC Install 31

Once you are happy with the placement of the cooper strip board, solder the wires together, orange to orange etc. The red and purple (black) can go directly onto the B unit chassis.  At this stage there are a few checks that you should make.  First, using a volt meter set to a continuity check, check that the left B unit chassis is connected to the left A Unit chassis, and repeat for the right.  Secondly check that the left and right chassis are not connected to each other.  Thirdly check that none of the chassis are connected to any of the cooper strip board terminals.  Then using 12v DC wires from a controller test that both motors are running the same direction when you connect them to the orange and brown (gray) wires and finally test the headlight works when you connect the 12v DC wires to the blue and white wires.

Bacmann F7 DCC Install 32

I also connected the fixed link coupler to the front truck of the B unit at this stage.

The last stage is to solder the six decoder wires to the copper strip board terminals and chassis points.  I have used a Digitrax DN163, it was a bit of a tight fit because this decoder has a plug on it making it thicker than normal but most N or Z scale decoders will fit.

Bacmann F7 DCC Install 33

I cut the front door of the B unit shell to fit over the wires the same as I did with the A unit and fitted it onto the chassis.  And there you go; two powered locomotives connected with a draw bar, which is prototypical, and one decoder.

Bacmann F7 DCC Install 35

But there is one more thing that you can do to make this even better and that is to have four locomotives with two decoders.

Bacmann F7 DCC Install 36 Normally the locomotives would all have different numbers but to make things easy I have configured the two DCC decoders to be both the same address and switched the rear pair to run in reverse as their forward direction.  This means you don’t have to consist the locomotives, and they won’t take up two slots in your DCC command station. This can all be done by changing the configuration variables or CV values; which can be fairly in-depth subject so it is something I will cover in a later post.

Re-powering A Dapol Semaphore Signal

Recently I have been working on a British outline OO layout which had some working semaphore signals.  Sadly some of these signals had suffered some electrical damage which rendered their control circuit boards inoperative. In this post I will be sharing with you a few simple methods of repairing Dapol semaphore signals.

The Dapol semaphores, as shown below, are nice looking signals and have a fairly basic drive system which is self contained in the tube below the signal.  Above ground there is a nicely detailed rectangular post with the rotating arm on top.  The arm is connected via a crank to a push-rod that runs down behind the post.  You will be able to see this in some later photos.  The glass lenses in the end of the arm are transparent and a small LED shines through creating the correct color.

Dapol Signals 1

Below ground is where all the clever parts are.  Interestingly the drive system on these OO signals is also used for their N Scale signals; Dapol have simply changed the size of the signal on top.  In the large threaded tube at the bottom of the signal is a circuit board, electric motor, gear rack and worm gear.  After the large nut has been removed there is a tiny screw at the base of the signal which holds the two halves of the tube together.  Once that has been removed the tube can be separated.

Dapol Signals 2

The motor is in the left half and the circuit board is in the right.  You can also see the push-rod that runs up behind the signal pole in front of the ladder.  And if we zoom in you can see below the push-rod is a spring.  This spring is attached to the push-rod and when it’s moved up and down the signal arm moves up and down.

Dapol Signals 14

The two pairs of metal contacts are part of the circuit board; as the motor spins the worm gear it drives the rack either up or down pushing the rod.  A spigot sticking out of the rack touches one of the pairs of contacts creating a circuit and telling the circuit board that the rack is at the end of its travel.  However as the circuit board is damaged these are of no concern to us.

As new, the signals work by providing 16v AC power to the red and black wires.  This powers the circuit board and the LED at the top of the signal pole.  Then by simply touching the two yellow wires together, using a momentary Push-To-Make switch, the signal will change. Even when you let go of the switch the motor will keep going untill the rack gets to the end of its travel.

On the first of the two damaged signals only the motor drive function was inoperable, the light still worked when 16v AC power was applied, so the circuit board was still producing low voltage DC which is also needed to drive the motor.  In the picture below you can see the wire connections.  The red and blue are the DC feed to the motor.  The tiny red and, hard to see just above the yellow, tiny black are the LED feed that run up inside the signal pole.  The big red and black are the 16v AC power in and the yellows are the activators.

Dapol Signals 4

So to fix this signal I removed the motor wires from the circuit board and extended them by soldering on some more wire and heat shrinking the joint.

Dapol Signals 5

Then I removed the yellow activator wires from the circuit board and added a pair of wires to the LED feed connection points.

Dapol Signals 6

The signal was then reassembled with the new wires coming out of the bottom.

The next step was to take the low voltage DC power, coming from the new blue and green wires, out to the layout control panel. Then, using a momentary double pole double throw (DPDT) switch, return the power to the motor wires, in positive or negative, to make the motor go one way or the other. The DPDT switches I use are toggle switches as shown below.

Dapol Signals 16

These have six connections on the bottom.  When it is thrown one way it joins the middle pair to the top pair and the other way joins the middle pair to the bottom pair.

So, if the incoming low voltage DC power is connected to the bottom pair, then reversed and connected to the top pair, throwing the switch one way or the other will reverse the DC power.

Dapol Signals 15

The motor is then connected to the middle pair of terminals, not shown above, and the signal can be manually controlled. My apologies as I got a bit carried away with the work and so didn’t take any more photos of this particular signal.  As the switch is a momentary, when you let go it springs back to the middle and stops the motor.  There’s no danger of pushing the motor too far as when the rack gets to the end of its travel it simply stops, although the motor keeps spinning.  The spring on the end of the push-rod, and there is another one on the bottom of the rack, supply just enough pressure to make the rack re-engage with the worm gear when you want it to run the other way.

This fix, although functional, is not ideal as you are still relying on a damaged circuit board and all the small parts inside the tube.  Plus you have to hold the switch untill the signal has reached its position.

The second fix I have for these signals is a bit moire drastic but I think in the long run is a more durable solution.

The second signal’s motor and circuit board had failed so I removed all of the parts from inside the tube.  Sadly the LED had also blown on this particular signal so the wires for that will go as well.

Dapol Signals 7

As all the points on this layout are powered with Seep point motors it made sense to power the signal in the same way.  Seep make a special point motor with a latching spring which is designed to work with hand-built points that don’t have a latching spring of their own.  The latching spring means the motor will stay in the required position even though the spring on the push-rod will be pushing back.  This latching point motor was mounted to a ‘Tee’ shaped mount as shown below.

Dapol Signals 8

There is a slot for the motor throw bar to pass through and the large hole above the throw bar is for the signal tube.

Dapol Signals 9

You can see the latching spring under the motor cross-bar.

Dapol Signals 11

As the tube on the bottom of the signal was now empty it could be reduced in length; this was also necessary so it didn’t hit the throw bar.  The last thing to do was to connect the throw bar to the signal push-rod.  However there is a problem in that the point motor movement is more than the signal needs, and as the point motors are powered by Capacitor Discharge Units the motor bangs over very hard which will damage the signal.

To counteract this I made a very basic omega ring out of thin nickel rod.  One end was superglued into the spring on the bottom of the push-rod, the other was looped around the motor throw bar.

Dapol Signals 13

Although basic, this omega ring absorbs the sudden shock from the point motor as well as any extra movement while still supplying enough force to move the push-rod.  The two shorter tube halves were glued together and the ‘Tee’ mount was screwed to the underside of the layout.  The signal was then put though the hole in the layout and mount.  Before the large nut was tightened up the signal could be tilted to one side to alow the omega ring end to be slid over the point motor throw bar. Once tightened up the omega ring could not slide off the throw bar, but as an extra measure I glued a small washer onto the end of the rod.

This second fix was a lot better because the signal changed quickly with a single touch of the switch and any wiring is the same as a standard point motor.

These signals have also been modified in a similar way with servo motors which gave a very nice smooth action and this might be something I will try next time.  If I do I will share it with you.