Upcoming NMRA (BR) Convention and New Prints Around the Corner

This weeks post is fairly short as I have been very busy getting several new print designs underway, not just because most of my current projects are finished, but because this year I will be giving a Clinic on 3D printing at the National Model Railroad Association (British Region) Convention. The convention is on the 17th to the 19th of October and will be held in Bournemouth, England, at the The Carrington House Hotel, here is a link.

The clinic is titled ‘How 3D printing works and how it can help you’ so I will be demonstrating what can be done with 3D printing and showing off some of my designs in various stages of the process.

I will post up a little nearer the time as to what day and time my Clinic will be and I look forward to meeting anybody that wants to learn more about 3D printing or simply wants to see my models in the flesh, or in this case plastic!

I also have a few new items currently being printed, actually as I type this post, which I will be sharing with you over the coming weeks. These include repair kits for small steamers, detail parts for Gas Turbines, some new locomotive shells and a few surprises.

The first large print that I am looking forward too is also my first HO scale model kit as well as my first test print in Shapeways Frosted Detail material.  This will be my Union Pacific Water Tenders, Jim Adams and Joe Jordan, which should be ready soon.  These will have parts printed in several different materials to reduce cost but I will cover this model in more depth in a later post.  For now here is a screen shot taken from my 3D model.

UP Water Tender 2007-Present HO

A little later this year these tenders will also be available in TT Scale and O Scale.  My Baldwin DT6-6-2000 will also be coming out in TT and HO Scales.

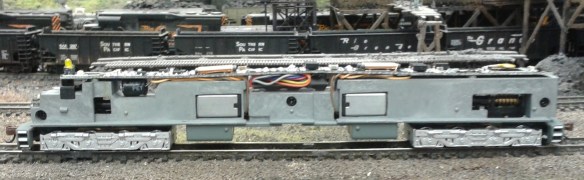
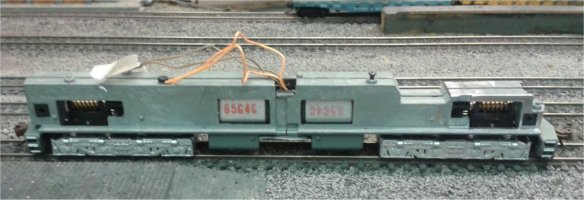
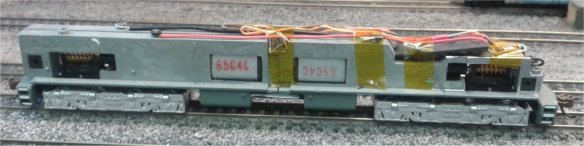
For N Scale I am currently finishing my Baldwin RT624 locomotive shell and will shortly be starting the big ALCO Century 855, which coincidently I announced I was doing at last years NMRA (BR) convention so I guess its time I pulled my finger out.

For those of you that will not be able to attend the convention I will be taking a lot of photos and videos of the layouts and displays to share with you, as this year neither of my clubs will be bringing a layout to run I will have more time to enjoy the convention.

*News* – Shapeways Normal Service Has Resumed

The issue with the Shapeways site has been resolved and the models are back up in my shop. Shapeways have rectified the problem with their search facility which was causing the problem and you should be able to shop now without any further issues, but please email me at jamestrainparts@yahoo.co.uk if you are still experiencing difficulties. Thank you for your patience.

*News* – Shapeways Experiencing Technical Difficulties

I know it is not my usual posting night but I wanted to let you all know that Shapeways are currently experiencing some technical difficulties with their website.  Not all of my models are currently visible and some models are not able to be ordered at present.  Shapeways are doing all they can to resolve this issue as soon as possible. Apologies for the inconvenience, and I’ll post again as soon as the issue has been resolved.

Running a Few Trains

The Gosport American Model Railroad Group had a running meet over the weekend for members to test new equipment and get part of the club layout ready for an exhibition in a few weeks time. So in this post I wanted to share with you some of the trains from the day.

I have mostly taken video this time and I am using YouTube to play them, for anybody who is not familiar with this you simply need to click on the video and it will start playing, also once it has started a symbol of a gear wheel will appear in the bottom right of the video, by clicking on this you can increase the quality of the video, which is recommended.

To start we have nice long Union Pacific coal train running past the power station.  The train is headed by two EMD DDA40X locomotives and an EMD DD35.  At the rear of the train there is another EMD DDA40X.

The first two DDA40Xs are Bachmann models, the DD35 is a 3D printed shell on a modified Bachmann DDA40X chassis, you can read more about this here.  The tail DDA40X is a dummy locomotive, it has been built from the spare DDA40X shell left over from the DD35 build and has been mounted on a 3D printed chassis and trucks.  You can read more about the DDA40X dummy chassis here.  As the dummy DDA40X has power pickups and the original lighting board, the flashing light on top still works, and the headlight has been replaced with a red LED as you can see at the end of the video below.

Keeping with the UP theme we also had an excursion train running on the layout headed by a UP 4-6-6-4 Challenger in two-tone gray, made by Rivarossi.

UP Excursion Train

This train has two extra water tenders, one pre-rebuild and one post.  These are both 3D printed and you can read more about them here.

The pre-rebuilt version, pictured above on the left, is slightly wider than the rebuilt version because a second sheet metal skin was removed in the rebuild.  In the pictures below you can just about see the difference in width.

UP Tenders 1 UP Tenders 2

The tool car behind the water tenders is a Con-Cor Amtrak express material handling boxcar that has been repainted.  The rest of the train is the Kato City of Los Angles set and I caught it rounding the corner past Ted’s farm.

Just before the excursion train left the station at Solent Summit a UP double header came through with  local freight.

Whilst at Solent Summit station the Canadian Pacific put in an appearance with a lumber train which had to wait for a passing mixed freight.

Over at the coal mine the Chicago & North Western trundles by with a local freight train.  Waiting in the team track is a Denver & Rio Grande Western 2-8-8-2 ready for a train.

The Burlington Railroad also runs through Solent Summit with a four car Zephyr as seen here and again over Hells Glen trestle.

Returning to the UP, and Ted’s farm, we have a set of EMD E7 with a streamlined passenger train.

The club layout is DCC powered and all the locomotives have a DCC decoder chip inside them, however these three locomotives share one decoder between them, you can find out more about this here.  They are also permanently coupled using fixed couplings which you can find here.

Whilst the E7s were in Solent Summit station the UP’s Portland Rose, it’s premier train on the Portland route, rolled into town.

The locomotive is another 4-6-6-4 Challenger in two-tone gray, this time an oil burner made by Athearn.  I think the photo below strikes a nice contrast between old and new as the steam powered heavy weight train was later replaced by the sleek yellow streamlined coaches and matching diesel power.

UP Portland Rose 1

And to finish up we have one more little coal train powered by the BNSF running past Ted’s farm.

The rest of the day was spent getting the layout ready for the public exhibition which I will share with you in a later post.


Shortening the Chassis of a Bachmann DD40AX

Having 3D printed the shell for an EMD DD35 I now have to alter the chassis of a Bachmann DD40AX so that the shell will fit onto it and give me a working locomotive. Actually, I can’t take the credit for the all the work done on this one, much was done by another modeller, Bob Norris, and the photos are courtesy of him.

DD40AX Side

There’s a lot of stuff on the circuit board, mostly used for directional lighting control.  The DCC decoder under the board is a standard Bachmann decoder.  We can’t shorten the chassis and keep the circuit board intact, so we decided to remove the entire circuit board and decoder…

DD40AX Top

this will later be replaced with a Digitrax chip…

DD40AX Circit Board

The Bachmann chassis is 24mm too long so the next problem is where to cut to shorten the chassis. We can’t lose length on either end because of the drive mechanism, but on the Bachmann chassis there are two motors, one next to each mechanism, so the only room left is in the middle of the chassis, between those motors. Each motor has an extra flywheel which fills this section but these can be removed, which would clear a space on the chassis of about 28mm.

DD40AX Motor Cut

Before you start shouting at the screen that taking 2 of the 4 flywheels out will make it less smooth, it didn’t. This is a cabless booster, it will be coupled to another loco, which will overcome any issues. So with that, let’s cut out 24mm. You can see the recess where the old fly wheels were.

DD40AX Center Cut Marks - 2

We marked the center of the chassis with the areas of metal to be removed. We also had to remove some material from the cab end, as the DD40AX was wider at this point and needs to be thinned to the same width as the shell body which will be dropped on top.

DD40AX Cab Cut Marks - 1 - Copy DD40AX Cab Cut Marks - 2 - CopyOnce the loco had been cut and re-assembled it was wired up for simple DC control, just to test, and it ran like a dream.

Reassembled

The joint between the two chassis halves was split with a plastic strip to separate the frame electrically.  In the DD40AX configuration the left and right sides of the chassis are separated by plastic washers which leave a gap of about 2mm.  To maintain the strength of the shortened chassis a plastic strip was added that filled this gap and bridged the joint. All the other faces where joined in a similar fashion, all glued together.

Reassembled Top

The view from the underside between the fuel tank mounts.

Reassembled Underside

Here you can see the cut down area where the cab was. We also cut down the top of this area to make room for the DCC chip, as there’s no longer space where it used to sit.

Reassembled Frount.15

And here it is with the DCC decoder reinstalled. The split front and back sections of the frame have also been joined by wires so as not to rely on the butted joint between the two halves.

Finished

This is how the shortened DD40AX chassis looks next to an unmodified original.

Finished With DD40AX

As you can see from the image above, there’s a lot taken out from the chassis. The result is the chassis for a working model of a DD35 locomotive, which is great as you can’t buy these anywhere else.

All in all I think a fantastic job, with thanks to Bob Norris. If you have any questions about shortening your own chassis to fit into your EMD DD35 locomotive shell  please feel free to get in contact.

Next post will cover finishing the model.