
Back in 2013 I started drawing my Yosemite Valley Railroad log cars; you can read the original post here. Since then I’ve built up a nice train of cars, however, I haven’t added couplings to them all. So in this post I’ll share with you my simple and cheap design to complete the cars.
The original log car design, as pictured below, was intended to be used with Micro-Trains Z scale couplings. These are compatible with N Scale couplings but are much smaller and look more prototypical. However, they are very fiddly to assemble and, if you are doing lots of cars, can get rather expensive. Also, if the coupling is slightly out of vertical alignment it can uncouple when the cars cross any bumps in the track. As I only run my log cars in a fixed rake and don’t do any switching with them, installing the Z scale couplings on all the cars seemed a bit over the top.

To resolve this I have designed a draw bar to be used with the same mounting point. The Micro-Trains coupling box fixes to the cars with a screw; a pilot hole is printed in the underside of the car chassis to ensure the couplings are fitted in the right place. My draw bars, as pictured below, are simply dogbone-shaped strips of 3D Printed Nylon. This material is Shapeways’ White Strong & Flexible and I’ve used this as it’s both strong and cheap to produce.
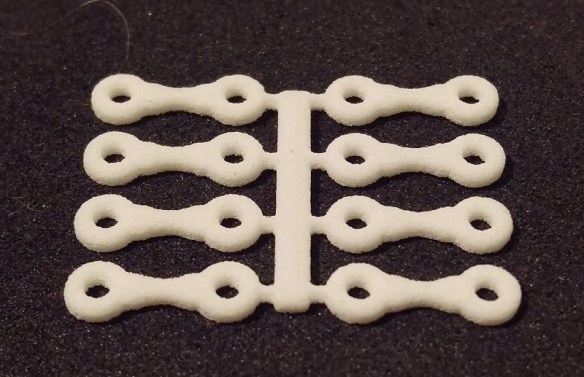
Pictured below you can see the draw bars next to the log cars for a size comparison.

The draw bars will come in sets of eight on a sprue and can simply be twisted or cut off with a craft knife.

The holes in each end are the right size for a Micro-Trains screw, although you will need to shorten the screw and tap the hole in the car body. Micro-Trains supply a tap set for this purpose which can be found on their website. Alternatively I use tiny screws which are just about the right length. I tend to get these from old CD drives and computer components which I’ve taken apart before throwing out. You will be amazed how many tiny screws you can accumulate like this.
Below you can see one of these screws in the draw bar, as it has a point it will tap the hole as you screw it in.

When the draw bar is fitted to the car the screw doesn’t want to be tight otherwise it won’t allow the draw bar to rotate. I have fitted the draw bar under the bulk head end of the car, that way if the screw is too long then the excess length will poke up between the bulk head braces and will be hard to see.

The screw does need to be tight enough so when the car is on the rails the draw bar doesn’t drop as you can see below.

For the other end you could use another screw but this means the cars are permanently coupled together. If you do a lot of exhibitions, like me, then this isn’t very practical. So I use a short section of wire simply glued into the existing hole. It needs to be a stiff, solid core wire, not a multi-strand. This also means all the cars can only be coupled together facing the same way, just like the originals.

This wire then acts as a pin which will fit nicely into the hole in the end of the draw bar to couple the cars.

Lots of cars can be assembled in this way but the first and last car will still need a regular coupling on one end so locomotives and cabooses can be attached.

My test pieces have been printed in white simply because it’s the cheapest colour but these will be available in black as well.
I’m going to assemble a few more cars and run the set at my local club as a test before I release the draw bars for sale. Logically there’s no reason why these couldn’t be used on any freight cars which have a body mounted coupling so I’ll try that as well and let you know how it works out.

You must be logged in to post a comment.